
Well, here we are, embarking on our last week of Wonder... the last week of 2010. I can't let you leave without some more great tips from our design team, so let me share with you the wonder of liquid pearls with our very own wonderful Diana!
Techniques Using Ranger Liquid Pearls
Ranger Liquid Pearls are not just for making pearls on your layouts, but can be used in a few different ways. Here in this technique tutorial I will show you how you can get the most out of your supplies. Liquid Pearls are acrylic based paint with shimmery goodness!
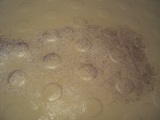
Creating a Mother of Pearl Texture:I used the packaging from the Prima stamp and crumpled it up to create a textured “stamp”.
I added some paint to the wrapper and applied it to the cardstock. You can also use your fingers, or a sponge etc.
The result is an uneven texture on the cardstock. Let the paint dry fully.
To give the paint some depth, I added some distress ink to the cardstock. The dried liquid pearls will act as a resist to the ink.
I added in some different colours of ink as well to give the appearance of a mother of pearl look to the paper.
Direct Application:You can create texture by applying the Liquid Pearls heavily on just about any surface. Here I used the chipboard snowflake and spread the pearls on thick. I used the tip to swirl it around and then set it aside to dry. I enhanced the texture by adding some ink too.
Creating Shimmer:You can dilute the Liquid Pearls with water and use it as shimmer paint to your paper and embellishments too! Here I used it on some paper that will eventually become an embellishment on my layout. I put a drop of paint on it, took a wet paintbrush to it and let dry.
The result is shown here, and of course, I used the Pearls for their more ‘traditional’ purpose on my embellishment.
I used the same shimmer technique on chipboard too. I inked the chipboard first and then applied the diluted Liquid Pearls to the chipboard. Let dry.
Embellishment:Using Liquid pearls as its own embellishment? Absolutely possible! I wanted to create a frosty icicle appearance on my layout, so I just applied the pearls directly to my layout to create a dimensional effect to my layout. I love this look!
So here are a few techniques to get you started in using your Liquid Pearls! Tomorrow, check out Shaina’s tutorial from a student perspective using my technique tutorial as a springboard to creating with Liquid Pearls on her layouts!


I know that these techniques have me wondering what great things I can do to my layouts and cards. If you're wondering what other great tutorials and ideas are available over at Scrapbooking from the Inside Out, you have to stop by our Inspiration page. While you're over there and browsing around, check our our kits and our community... great people with wonderful talent and ideas and sharing! Join us! We'll be wondering where you are until you do...
1 comment:
I was searching for Perfect Pearls techniques and found yours. I think they're great. I cannot believe that not one person made a comment!! Thanks for your tutorials.
Post a Comment