
Hello friends! I can't believe how close Christmas is and this weekend, when our attention has not been on our recuperating dog, it has been on getting ready for Christmas. We hit a few bumps in the road, of course, so we didn't make as much progress as we'd wanted. The house is in quite a bit of disarray but rather than cleaning it, I decided to stop by here and share with you another great tutorial by one of our design team.
And since my focus has been on Christmas, how about a tutorial on easy glamorous ornaments? Check out what Felecia has to share with you:
Easy Glamorous Ornaments
I just can’t help it – nearly my full attention this time of year is on Christmas.
Christmas and Thanksgiving are my favorite holidays…but Christmas holds a special place for me. I find nearly everything about it just magical and wonderous. Santa has come to my house every year, even those where there were no children in my home.
One thing I’ve done since childhood is collect special Christmas ornaments. It’s a tradition in my family that ornaments to celebrate something special from the year are given at Christmas. When I take each of these out to decorate my tree, I get the joy or remembering all those special events of my lifetime. It makes trimming the tree a very heart-warming experience.
This kit is so full of amazing details that I felt compelled to make some glamorous Christmas ornaments with some of them to add to my tree – to commemorate that this last year, I was privileged be a part of the SFTIO Deisgn Team!
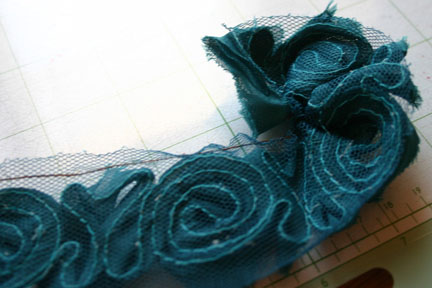
For this first one, you’ll need:
A length of the fabric rose ribbonNeedle and thread1 inch paper circle, scallop circle or other shape for the center of the ornament.2 ½ paper circle or scallop circle for the back of the ornamentMetal buttonQuick-dry adhesive such as Zip Dry
Step 1) Using the needle and thread, do a running stitch along one side of the fabric rose ribbon. Slide the fabric along the thread forming a circle
Step 2) Continue gathering until you have a complete circle. You can make the circle as big or small as you wish. When gathered to your liking, sew the ends of the ribbon together.
Step 3) Punch (or poke) a small hole in the 2 ½ inch paper circle (to lace for hanging later!) and then adhere your rose ribbon circle to the large circle using Zip Dry. (I just ran my zip dry around the circle about ½ an inc from the outside edge.
Step 4) Cut a small slit in the small circle and push the button shank through the slit.
Step 5) Glue the button and paper circle to the center of the rose ribbon circle.
Now thread with a bit of decorative ribbon or twine and hang.
For the second ornament, you’ll need:
2 strips of paper 12 x 1 ½ inches2 punch circles, around 1 inch2 embellishments (for the centers of the ornament)Jumbo Glue dots (from Zots) or a strong quick dry adhesive such as Zip Dry


Step 1) Starting with one short side, lightly score each paper strip at ½ inch intervals and then accordion fold.
Step 2) Attach the accordion strip folds together, overlapping ends to form one loop.
Step 3) Place adhesive on the back of one of the punched circles, and lay it face up on the work surface. Gather the folds of the accordion folded paper look in the center to form a rosette. Place the rosette on the punched circle. If you are using quick dry adhesive, hold this in place until it is secure.
Step 4) Adhere the other punched circle on the opposite side of the rosette.
Step 5) Adhere flower embellishments to the punched circle on each side of the rosette. I used the Prima flowers, but you could use any of the embellishments, including glittered or painted chipboard pieces.
Poke a hole through the top and hang with ribbon or fishing line.
Happy Scrapping!


Wow! They really are super gorgeous ornaments. I'm so excited to play with the tips Felecia provided in this tutorial. Wouldn't they make great package toppers too? Thanks Felecia! I can't wait to get my hands working on my own glam ornaments!
1 comment:
These are so pretty! Thanks for sharing with us!
Post a Comment