In our Delight kit, this month, we've got the super fun and DELIGHTful DIY Thickers. I thought I would do some experimenting for you. If you haven't heard of Myth Busters, it's a show on the Discovery Channel that follows a crew who makes it their mission to find out if something is for real or not. For example, an urban legend. Or maybe something someone has claimed is possible, etc. It's kind of a fun show!
The reason I've dubbed this post as "Myth Busters" style is, after experimenting with the DIY Thickers, I totally felt like the folks on the show. I tried all kinds of things with these babies. Some good. Some bad.
First... let me tell you that you canNOT heat emboss them. Ha! I tried. They melted. It was sad. But I did it for you, okay? Because that's the kind of person I am. I will save you your DIY Thickers from the heat of your embossing guns.
Now what you CAN do...
We've already begun the process by including some micro-beads in this months kit. These are a fun little embellishment to use. My tips?
Well... for any of what I'm about to show you... I have found it very helpful to cut out my letters while they are still on the backing sheet. Apply the embellishment and then peel them off to apply to your layouts.
For the micro beads, I poured them on top of the letters and pressed them down with my fingers. They stayed pretty good.
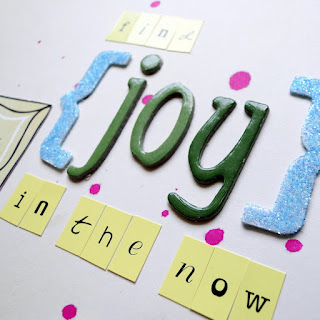
The next thing I wanted to try was glitter. Usually, I'm not a fan of glitter but I just wanted to see what it looked like. I still have some little bottles of "sugar coating" by Doodlebug Design. I've had them sitting on my supply shelf forever. It is very fine glitter with a fun "sugary" look to it. I dumped it on top of the Thickers, pressed down and tapped the rest off.
I wanted to take this a step further. The glitter tends to flake off which is why I don't really enjoy glitter. It ends up everywhere. So... what would it look like if I sealed it up with some Glossy Accent? Would it bend the Thickers? How would that foam material respond to the glaze?
It worked beautifully! If I were to do glitter again, I would definitely add Glossy Accents on top again.
It worked beautifully! If I were to do glitter again, I would definitely add Glossy Accents on top again.
The final experiment was to apply Crackle Accents (we had a little bottle in a past kit) directly to the Thicker. I took off the paper to reveal the sticky and applied the Crackle.
What did I learn? Well.... it looks cool but the Crackle peels off of the Thicker if you pick at it. I learned that when you apply Crackle to a sticky surface, it doesn't grab onto it like it does to paper.
Oh well. We'll see how long it stays...  It LOOKS cool!
The DIY Thickers are so much fun to experiment with!
I also tried adding Alcohol Ink to them to color. But with the sticky adhesive, you really need to apply a physical element like glitter, confetti or beads, etc.
Have fun experimenting and hopefully my little "Myth Busters" approach has helped.
I also tried adding Alcohol Ink to them to color. But with the sticky adhesive, you really need to apply a physical element like glitter, confetti or beads, etc.
Have fun experimenting and hopefully my little "Myth Busters" approach has helped.


3 comments:
Great tips!!! Thanks for busting some Myths and of course confirming other's...My favorite line of all time, Adam "I reject your reality and substitute my own" :D And that's what you've done perfectly here with the experiments. And I'm with you on the Horror's of Glitter. but I learned something else new too, I never knew about the crackle medium :)
Thanks for the tips on these alphas! It's good to know what works and what doesn't!
love this - I have been a little clueless as to what to do with them.
Post a Comment