
Check out this awesome layout by one of our very talented design team members:

While you're reflecting on this gorgeous layout, allow me to share one of my other favorite pieces of SFTIO - design team tutorials. If you're a member of our community, these come to you direct from our design team specific to our kit content of the month.
Check out our first tutorial this month... thank you Christa!
Photo Frames
I'm here with my very first SFTIO tutorial and am a bit nervous! Not to mention the fact that I think I'm one of the most un-technique-y people I know, but I do try to use things a little differently each month.
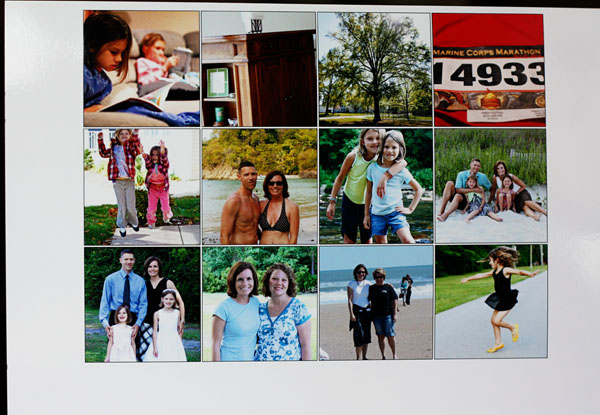
Rarely does this happen to me, but when I opened my January "Reflection" kit I knew exactly what I wanted to do with the Kaisercraft Classified paper - make photo frames! I love the look of the cards and knew I could fit lots of little photos in them for a collage look.
For this you will just need the Kaisercraft paper, a craft knife and lots of different photos to use.
I started by printing my photos wallet size on one sheet of photo paper. I printed a few more than I knew I would use so I would have a choice and not be running back and forth to the printer.
I cut 12 cards out from the paper, leaving a few for future projects. I wanted to use the black/gray polka dot cards as well for embellishment so those were cut too.
Next, just take your craft knife and cute along the black/gray line of the inside square so that you are left with the square image and a cut out in the card.
I cut each wallet photo and lined it up behind the open space to figure out where I wanted it, then used adhesive to keep it in place.
After that I simply moved them around on the page to where I wanted them, and adhered them to the page. You're left with a nice collage of pictures to represent one occasion, a span of time or just some of your favorite photos for a layout. I added some of the awesome embellishments to the polka dot cards for more dimension.
I did a large block journaling to reflect on all the photos I chose from the year and put it on another page. You could just as easily use journaling strips along each photo to keep it to one page.
So that's it. Easy peasy to turn the cards into photo frames!


Thanks Christa! Those frames are super cute, and I bet you can use the pieces you cut out as embellishments in other ways... on layouts, cards, tags or collage them on a project. Oh, the creative juices are churning...
2 comments:
Oh la la! I love this. I never would have thought to do that with those cards. The effect is lovely.
Great layout!
Thanks for sharing. :)
this is such a great idea and concept that can be used in many forms. thanks!
Post a Comment